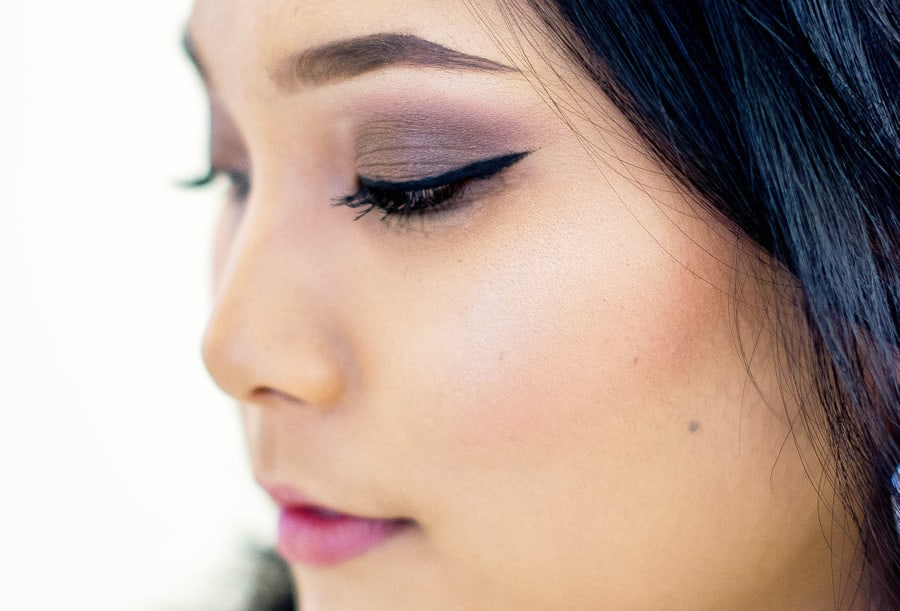
How to Do Winged Eyeliner: Step by Step for Beginners
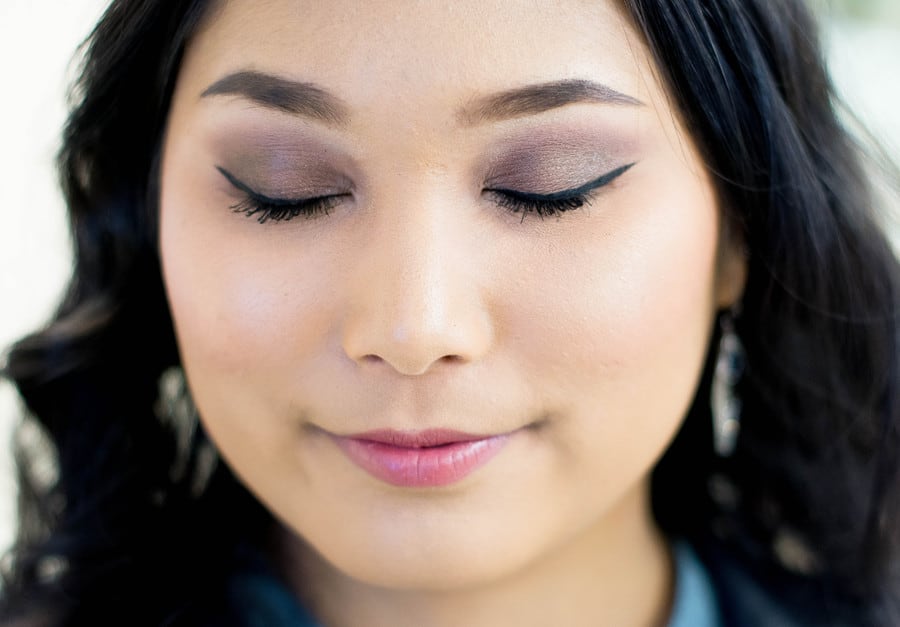
Winged eyeliner is one of the most the most fierce, understated, and classic makeup looks. It’s appropriate for all occasions and sends the message that you respect yourself — and demand respect from others. Despite all of those perks, it’s harder than it looks to achieve the perfect winged eyeliner. If you want to learn how to do winged eyeliner, just follow these simple steps (and don’t forget: practice makes perfect!).
Step 1: Choose a Type of Eyeliner
There are a few different types of eyeliner you can use. You can either opt for a liquid liner with a self-applicator tip or wand included (this is the easiest option) or choose to use powder or gel liner and an eyeliner brush. The latter takes a bit more skill, so if you’re a beginner, it’s best to wait until you’ve mastered liquid eyeliner before trying your hand at a more complicated option.
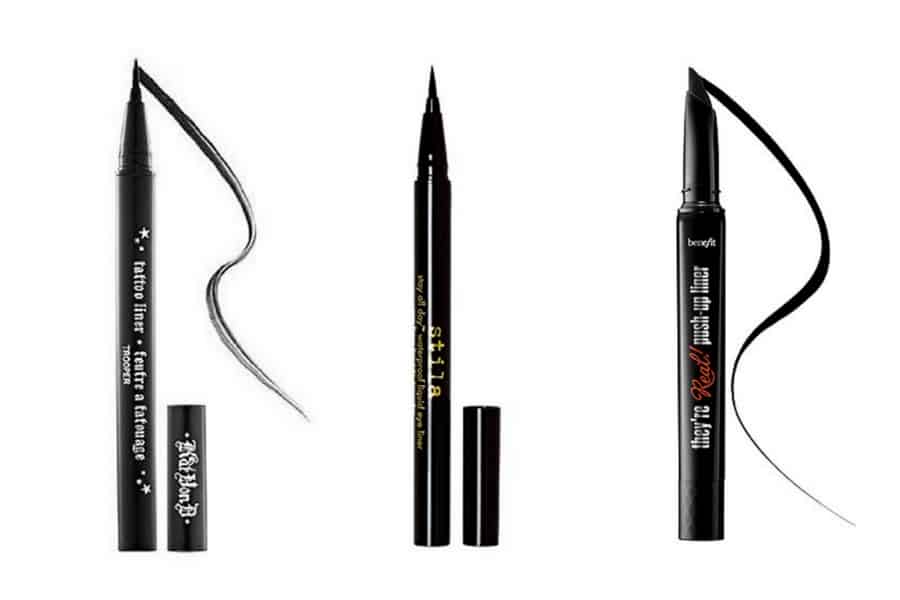
ESL Picks: Kat Von D Tattoo Liner; Stila All Day Waterproof Liquid Eyeliner; Benefit They’re Real! Push-up Liner
Step 2: Remove All Makeup
This is often an overlooked step, but a clean surface is key to having a clean line. So wash your face, and make sure to remove all remnants of mascara and eye shadow before applying your winged eyeliner.
Step 3: Apply Your Makeup as Usual (Except Eyeliner and Mascara)
You don’t want to put on your eyeliner first thing. Apply your foundation, cover up, blush, bronzer, and highlighter first. If you want to pair eyeshadow with your winged eyeliner, then go ahead and apply that too. The last thing you want to do is smudge the perfect wing by applying makeup on top of it.
If you don’t want to put on eyeshadow, then you can skip it. However, I recommend swiping on a neutral-colored eyeshadow for a natural look that will even out your skin tone.
Step 4: Prepare Your Eyeliner Brush
For those using liquid liner, this step simply involves shaking the tube of liquid eyeliner and swirling the wand before you pull it out of the tube.
If you’re using an eyeliner brush and either gel or powder liner, then you need to dampen your brush with clean water. You’ll only need a little bit of water if you’re using gel liner since it has its own moisture. If you’re using powder, you will need more water in order to create a paste-like consistency. Still, be careful not to get the eyeliner brush too wet, or you’ll have a harder time getting a defined, dark line along your lid.
Step 5: Start Your Line
Lightly holding the brush with the tips of your fingers (similarly to how you would hold a pencil but with less force), place the tip of the brush at the inside corner of your eye. Don’t press down heavily. Instead, simply draw the brush lightly along the top of your lash line until you reach the outside of your eye. You can draw in one continuous motion or choose to apply multiple light brush strokes along your lash line. Do what feels natural, and make sure not press down too hard to avoid losing control of the brush. Do not go past the outside corner of your eye.
Before moving on, check your line to see if there are any spots that need more liner. Fill those in if needed, but don’t worry about it too much. You’ll go back over the line again at the end.
Step 6: Prepare for the Wing
Dip your brush in the liner again. You may want to put a little bit more water on your brush if needed. The important thing is to make sure you’ve got enough liner on the brush for it to glide smoothly.
Step 7: Draw the Wing Edge
Now that your brush is ready, take your free hand and gently pull the skin on the outside of your eye towards your temple. This prevents the brush from snagging on your skin. In order to get the perfect angle for your winged eyeliner, you want to draw the brush from the outside corner of your eye up toward the far corner of your eyebrow. However, you can also opt for a wing that stays more level with your eye.
Choose which angle you prefer and lightly draw the tip of your brush out until about halfway between the outside corner of your eye and the edge of your eyebrow. You want to make sure this line is very thin and light so you can easily remove it should you decide you don’t like the angle or need to redo it for some other reason.
Step 8: Define the Wing
After you’ve got the edge of your wing at the length and angle you prefer, you can define the wing. Winged eyeliner can be thick or thin. If you want a thinner line, then all you have to do is trace over the line you’ve made until it’s the same thickness as the line along your lashes.
For a thicker, more dramatic look, take the tip of your brush to the very end of your line and trace it backward towards your lashes, leaving empty space between the two lines. It should look like a long, thin isosceles triangle. To be safe, start with the wing thinner rather than thicker — it’s easier to add to the line than it is to take away. After you’ve reached your desired thickness, re-dip your brush in the liner and fill in the triangle you’ve drawn.
Step 9: Go Back Over the Entire Line
Take your brush and swipe it back along the entire line you’ve made from your inside corner to the mid-wing. This ensures your line looks seamless.
Step 10: Fix Your Other Eye
Repeat steps one through nine for your other eye.
Step 11: Apply Mascara
Congrats! You now know how to do winged eyeliner. Now you can finally apply your mascara and take over the world.
Step 12: Bat Your Eyelashes (Optional: Take a Selfie)
Because girl, you fine. Oh, and don’t forget to top off your winged eyeliner with your favorite lipstick.

amzn_assoc_placement = "adunit0"; amzn_assoc_enable_interest_ads = "false"; amzn_assoc_tracking_id = "bonfirepublis-20"; amzn_assoc_ad_mode = "auto"; amzn_assoc_ad_type = "smart"; amzn_assoc_marketplace = "amazon"; amzn_assoc_region = "US"; amzn_assoc_rows = "1"; amzn_assoc_linkid = "a1985f612bacd076908d4fb1c955bcfc"; amzn_assoc_emphasize_categories = "3760911,283155,1036592,672123011,133140011,284507,1064954";
Last modified on January 15th, 2019


Show Comments +